Saturday, August 30, 2014

Hawaii Sunset Blocks Together

 It took most of the day to get these blocks together.  There was an unfortunate moment when the dog got very excited and started running around in circles.
So maybe all of the blocks didn't end up exactly where I wanted them, but at least I finally found them all.  Its a really good thing I love my dog.  Though she would also make a nice pot roast.  Just kidding.
Borders tomorrow?  Maybe.  

ScrapHappy Saturday Farewell and Moving On

 I'm feeling done with green.  I might putter a bit more today while cleaning them up and putting them away.
But I am feeling ready to jump into orange.  Bright, happy and beautiful orange.
While getting ready to start a new month, I'll go ahead and open up the giveaway for September of beautiful hand dyed fabric by Vicki Welsh.  I've already started to talk to Vicki about next year and I am really excited about the wonderful plans that we have worked up together. I won't say more than that, but be sure to keep some scraps for the new year if you can.   To enter the giveaway, just leave a comment with your one word goal for the weekend.  It is a three day weekend for me and my one word is SEW.  

Monday, August 25, 2014

Around The World Blog Hop

Andee at Modern Diary has invited me to participate in a blog hop.  Amy and Ros are also up today, so be sure to check them out as well.  The idea of the blog hop is to talk a little about your quilting process and then invite three other bloggers to post the following week.  I'm opening my invitation up to the first three readers who would like to post next week about your progress.  Just leave a comment on this post asking to join in the fun and I will add a link to your blog at the bottom of the post.

For anyone who doesn't usually follow along, I'll take a few minutes to introduce myself.  Hi, I'm Angela, and I have a quilting problem.  I started with a baby quilt for each of my three children, now teenagers, but before I knew it, quilts had started to take over!  I had fabric and blocks and thread everywhere.
For the last few years I've been hosting the Rainbow Scrap Challenge.  The ideas is simple, rather than letting your scraps overwhelm you, use them up  -- one color at a time.  Each month I choose a color and invite anyone who wants to join in to use their own scraps to sew something.  The projects are as varied as the quilters who share them and it is a never ending source of inspiration and encouragement.
This year I was lucky enough to have a sponsor.  Fancy, right?  Vicki Welsh has been kind enough to provide some of her lovely hand dyed fabrics for giving away to to RSC participants.  We've already been working together to plan for next year and I'm even more excited for what we have to look forward to in 2015.  I've designed a special quilt with her fabrics as the focus and will have tutorials each month for anyone who wants to join in.

I've always got WAY too many project going on at the same time.
Right now my big project is a Rainbow Scrap Challenge Dear Jane.  All the center blocks are done.  I'm working up some energy for those side triangles!
 My first foray into hosting a quilt along has been a sampler quilt of 6 inch rainbow blocks.  I've been posting tutorials for blocks to go along with the color of the month all year long.  Some of the blocks are traditional and some are a little more modern.  Variety is the fun part of samplers. I've been letting some setting ideas simmer and I'm starting to get excited about putting all of my blocks together.  I think it will have a modern twist in the end.
 I love anything with scraps, the tinier the better.  Lately I've done quite a bit with postage stamps.  These little blocks are 36 patches.  They were "extra" bits from another project.
This is the block that started it all. 
  As  side effect of using ALL of my scraps, I've started working with tiny blocks lately.  The nine patches in are made from 1 inch strips.  I'd love to do more with miniatures in the future, but it takes a long time to use up scraps that way.
I even, occasionally, make quilts that are not rainbow themed using patterns by someone else.  This Hawaii Sunset quilt was inspired originally by Jo, and when Andee, and Amy and Andra all joined in, I knew I was doomed.  Even though it is a reproduction pattern, I still seem to gravitate to the bright and happy colors.  
  Every so often I go on a binge of finishing, usually during summer vacation, when I have some time off from school.  The advantage of having so many projects in the pipeline is that it is always easy to pick something in the "almost done" stage to finish off when motivation is running hot.  

 My design process usually starts with an idea or pattern that I find while enjoying all of the great quilt blogs that are out there.  I love to pin inspiration quilts on Pinterest.  Rarely do I try to duplicate a quilt exactly, instead I love to combine my favorite parts of different quilts to end up with something unique to me.  This batik star quilt for my Aunt Brenda started with a simple star block, but was designed to use two colors of background fabric based on a sampler quilt that I had seen along the way.
Though I do have quilt design software, I love to sit with graph paper and colored pencils to plan out my quilts.  Sketching out quilt blocks is a great way to stay occupied while sitting through a faculty meeting of waiting to pick up one of the kids.
Want to play along with the blog hop?  Be one of the first three to respond to this post and I will tag you to join in next Monday.


Sunday, August 24, 2014

Hawaii Sunset Progress

 Yesterday was super busy with no time at all to sew.  I was determined to make up for it today.  Amy recently finished her Hawaii Sunset top which inspired me to pull my blocks out again.  They have been done for ages, but I needed more sashing strips and some of the odd little setting triangles to be able to sew it all together.  I was able to get everything cut out while the kids were swimming this morning and now they have gone off to play and I am ready to start sewing the rows together.  I'd better get busy quickly before the dog comes and helps me rearrange things.
 Hopefully that will leave a bit of time for slow stitching the binding on Jamestown Landing.  Sundays require a bit of relaxation after all.
The main activity that kept us all running yesterday was a trip to St. Augustine to visit family in from out of town.  Aunt MaryAnne passes away this summer and everyone came down for the memorial service on Friday.  From the back left it is Kurt's mom and dad, Bonnie and Tom.  Next to him is his brother, Uncle Bob and his wife Aunt Barb.  Then there is Kurt on the right and the kids all in the front row.  The rest of the aunts and uncles headed out Saturday morning, but we spent the day exploring downtown and ended the day with a dinner out before heading home again.  It was so nice to be able to catch up and visit for a while.  We live so far away from everyone that it is easy to loose touch.
It was unbelievably HOT yesterday, but we tried to walk slowly in the shade and cool off with a bit of ice cream and some swimming.  I can't remember it ever being so hot for this long since we moved here 16 years ago.  Hoping for cooler weather next week.  Ryan had a football game yesterday as well, thankfully it was early in the morning before the real heat of the day set in. 

Saturday, August 23, 2014

ScrapHappy Saturday - Light and Bright

I've been thinking about some string blocks for next years RSC.  Strings are always so pesky to store, they get tangled and frayed along the edges.  I thought I'd try something new.  I used a safety pin to connect color coordinated strings together.  Then I found a belt hanger and just slid the safety pin onto the little hooks.  Now I can hang the strings up until I'm ready to use them and they won't get all knotted up.
Thinking about sewing is about all I've had time to do since school started, but I'm sure there will be some sewing time in my plans for the weekend.  How are your light and bright greens coming along?
Use misterlinky below to share your progress.


Friday, August 22, 2014

New Quilt Rack

 Look what came in the mail today!  Some assembly required, but it wasn't long before my new  rack was up and ready for quilts.
 It has five rungs.  The finish is called gunstock I think.
And it angles out from the wall a bit.  I've been wanting to have a place to hang quilts for quite a while, and finally found an Etsy seller with a style that I liked.  I'm really pleased.
The first week of school is over and I think I will celebrate with a bit of sewing while the boys are off at football.  I brought home a bit of grading to catch up on, but I'll save that for our car trip tomorrow.  Not quite as much fun as hand quilting or applique, but I guess its my fault for assigning summer reading.  It was optional, but the kids who chose to do it seemed to really enjoy the books they chose.

Rainbow Scrap Challenge Sampler - Bouncing Betty

This is one of those blocks that would be great for using up extra HST block. Bonus triangles, binding triangles. There seem to be so many leftover triangles hanging around.
If you don't have a basket of HST blocks hanging around, you can make your own in two sizes.  Start with 3.5 inch strips of green and background and 2 inch strips in a contrasting color and background.  I chose blue because I just couldn't find a green that I liked.
Place the 3.5 inch strips right sides together and use the easy angle ruler to cut 2 units.  If you don't have 3.5 inch strips, you can also cut two squares 3 7/8 inches and cut them in half.  For just two blocks it is just as easy to do it this way.
Next place the 2 inch strips right sides together and use the easy angle ruler to cut 4 units.  You will also need 4 squares on background fabric, 2 inches each.
Sew all the HST units together, remove dog ears and press to the dark.  The small squares will be combined with the plain background fabric to make two adorable little four patches with the dark corners meeting in the middle.  Sew and press the four patches.
Next, put these four patches together with the larger HST blocks already sewn.  Sew these together as a four patch with the seams facing toward the green to reduce bulk.
Easy as can be, right?  Imagine a sea of scrappy little blocks together with a unifying color for the larger pieces.  Great stash busting scrap quilt.  

Wednesday, August 20, 2014

Back into the Groove Again

So my first day of school photos got taken on the third day of school this year.  What a slacker mom.  Anna is in 9th grade this year.  High School!  It doesn't feel quite so different because our school is 7 thru 12.  Ryan is finishing middle school with 8th grade and Sydney still has two more years of elementary.  They all seem happy with their schedules and teachers, though it has been an adjustment for sure.  Gone are the lazy happy days of summer wondering what to do with the day.  Instead we are just making sure to fit in everything that needs to get done.  We started with a full 5 day week this year and I am sure we will all be dragging a bit by Friday while we adjust to the new schedule.    No time for sewing so far, but maybe on Friday?  We are headed out this weekend for a memorial service for  Aunt Maryanne in St. Augustine.  She passed away earlier this summer, but they timed the service to allow family to get together and visit a bit.  

Sunday, August 17, 2014

Last Day of Summer Vacation

School starts tomorrow!  Supplies have been bought, backpacks have been stuffed and lunches have been packed.
 In what has become my bizarre end of summer tradition, I went out in the woods behind our house and gathered termites.  I've gotten much better at finding them than last year.  Look at all those little guys!  I do a lab with my AP class and we talk about emergent properties and levels of organization.  Did you know that termites will follow ink trails left by certain brands of pens but not others?  Fun fact of the day, and you thought this blog was all about quilting.
 I also washed a bucket of rocks for my other bio kids.  I used to do this really cool lesson with a peanut on the first day of school.  Everyone grabs one on the way in and then studies it while I talk dramatically about observation and the scientific method.  Then they all put their peanuts back in a bowl where they get mixed up and then they have to find them again.  About 10 years ago, I brought up observation again about halfway through the year, and Susie remarked that it was just like the peanuts from the first day.  I got very emotional that she had made such a meaningful connection when she pulled her peanut out of her backpack.  Just as I was about really to loose it, several other kids all pulled out their peanuts while the rest told me where they kept theirs at home.  Those are the moments that make you remember why you teach.
Well, peanuts are now totally taboo.  I have one student who will react so strongly to peanuts that I can't touch them and then grade papers.  I tried it with apples one year, and that was nice, but expensive.  So this time I'm going to try rocks.  Maybe they will want to have a pet rock when we are done?
I just took the last stitch in the periodic table quilt so that I can get it hung up for the first day.  Kurt bought a big long piece on conduit for a hanging rod and some hooks.  So I guess those are odd preparations for the first day of school, but it looks like I'm are just about ready for students.  

Rainbow Scrap Challenge Sampler - Ticker Tape

Full disclosure first. This block is totally NOT original. I saw a tutorial on on Crazy Mom Quilts. She did a whole quilt though, and it was a quilt as you go technique.   I was thinking about this block for next years Rainbow Scrap Challenge and thought I would try it out.
You will need a 7 inch square of background fabric and a stack of scraps. This will give you a little wiggle room to square up in case your block gets frayed during the sewing process.  Use a water erasable marker to draw a 6 inch square inside.  This will give you a framework to make sure your scraps will all fit inside the seam allowance of the finished block.     I always seem to have a stack of leftovers after a trimming session.  These tiny scraps are too small to be cut into useable sizes, but too cute to throw away.  They are just perfect for this block.
Starting in one corner of your block, making sure to stay inside your marked line, start puzzling your scraps together.  Feel free to trim pieces down to fit in empty spaces. Play with your scraps, leaving a little border around the scraps about a quarter of an inch or so.  Arrange them until you are happy with the finished look.  Now go grab a glue stick.  I like the disappearing purple school glue and use it all the time for quilting projects.  Just put a little dab on the back of each scrap to hold it in place until the sewing is done.  If you don't like the idea of using glue, you could also pin these, but I really do try never to use pins unless it is absolutely necessary.
Starting in one corner, and using the eighth inch mark on the inside of your quarter inch foot, sew just inside one edge of your first scrap.  Using the needle down position in the corner, pivot and continue around all four sides.  Use two back stitches to secure your stitches when you get back to where you started and neatly trim your threads.  Move to the next square and continue to sew just inside the edge of each little square of fabric.
Look how cute that it!  At this point you may gently rinse your block to remove the glue residue and erase the water soluble marker.  Press and square up to 6.5 inches unfinished.  I really could see a whole quilt of these in all the colors of the rainbow.  

Saturday, August 16, 2014

ScrapHappy Saturday -- Green Grass of Home

This is where I decided to head with the tiny nine patches that started as an Omigosh quilt.  Instead of the shoofly blocks with little on point four patches, I'm going with my own personal variation -- little churn dash variants.  There are a few little bits sitting next to the machine waiting for their turn, but this hasn't been my best week for sewing.  With school starting Monday there is lots to get done this weekend.  I hope you are all sewing though, and I hope to check in on everyone soon.
Use Mr. Linky below to share what you have accomplished so far with your greens.

Tuesday, August 12, 2014

Back to School Sewing

I bought some periodic table fabric from Spoonflower ages ago.  I got intimidated though, when I realized that most of the rare earth elements (the yellow ones at the bottom) needed to be individually pieced together.  I didn't have any wall space to hang it in my classroom anyway, and so it got saved.  After moving a few things around at the end of last year, I found some space that might work and thought about giving the periodic table quilt a try again.
So I took a deep breath and started cutting the elements out with a quarter in seam allowance.  I still need a small white border on the right and bottom.  Maybe I can get it quilted this weekend.
The first two days of preplanning went well.  They are trying hard to give us more planning time this year.  After losing a planning period last year, everyone is desperate for more time to get things done.  Maybe someone is finally hearing us, because so far we've only had two hours of meetings each day.  Unheard of!  Usually it is at least 4 hours of sitting in meeting each day while making a list of all the things you are hoping to get done before the kids show up bright and shiny.  Monday is the big day for the kids.  Registration is tomorrow, so we'll start seeing their happy faces again soon.  

Sunday, August 10, 2014

Sunday Slowdown

I was ready to settle down on the couch and do absolutely nothing this evening.   Then I saw a Downton Abbey special on PBS and had an urge to stitch a bit of binding to say goodbye to the weekend.  It didn't take long to get the binding sewn on to the front of Jamestown Landing.  
Everything is scrappy about this quilt, even the binding, but somehow it all goes together because everything is green.  I've got all my supplies handy in a purple zipper case that I sewed up earlier this summer.  With that, I'm off to stitch a bit of binding.  I hope you are all finding a reason to sit with a bit of handwork today.  Be sure to visit Kathy and see what everyone is up to.  

So Close

I thought I was done with the flimsy and backing for Strings and Crumbs.

I did the inner border, and the crumb border and even the wide calming outer border.  Borders are my nemesis, so I was doing pretty well I thought.
I almost had just enough for the backing.  Just need about three more inches, of course I don't have three more inches.  I might add a stripe of the inner border fabric to the middle.  Not today though.  I am ready to start cleaning up some of the chaos and settle in for the evening.  I'll write a note and put it with the top so that I remember what I'm supposed to do next time I pull this guy out.  

Out of Chaos?

Out of chaos comes order?  Right now I'm not too sure about the order part, but I am creating quite a bit of chaos with my strings and crumbs.
Taking the paper off of string blocks is always fun.  There are bits of paper everywhere in a little path of confetti leading from the sewing machine to the iron to the floor.  I only needed 6 more crumb blocks for the border, but it isn't easy to make just 6 crumb blocks.  I've got the inner border sewn on, and I think I'l extend it out into the outer border.  It is some sort of very stretchy homespun fabric -- spray starch has been my friend today.  Then the outer border should be pretty easy and this little guy will hang for quilting at a later date.  The quilting machine isn't set up right now, I'll wait until there is a nice little stack of quilts and a chunk of free time.  Christmas break maybe?  Starting to get anxious about heading back to school.  Change is hard.  I had a dream last night where I was passing back papers, but didn't have enough.  I couldn't figure out where all of my papers had gone.  Sigh.  I'm off to sew the crumbs together to make a border.  Happy last day of summer vacation.  

Rainbow Scrap Challenge Sampler - Northwinds

 The large corner triangles for this block were cut from dark and light squares of fabric that were 4 7/8 inches.  You could use 4.5 inch strips and the easy angle ruler, but for just one block, it isn't much easier.  I always seem to have extra 5 inch "nickel" squares hanging out, so this seemed like a nice way to put them to use.  Take one square of light and one square of dark and cut them both in half from corner to corner along the diagonal.
 The smaller triangles I did cut from 2.5 inch strips.  Place your dark and light strips together and cut 5 HST units.
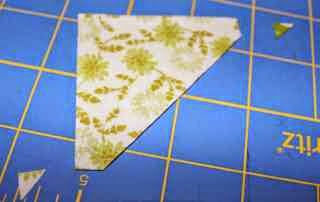
 I puzzled for a while about how to match up the triangle points, and finally decided to remove all the dog ears ahead of time.  Just use one of the easy angle corners as a template and trim away the extra dog ear from each of the triangles.
 See how much easier everything lines up now?  Lay out your block with a large triangle in each corner.  Next line up the hypotenuse of the light triangle up next to the dark square and reverse for the light triangle.  Fill in with the opposite colors.  Refer back to the picture to make sure you get everything placed just right.  I was trying to figure out how to assemble this from half square triangle blocks, but eventually decided it would be easier to assemble diagonal rows.
 Start with the dark HST units and fold them over the light triangles.  Sew along the matched leg of each pair of triangles.
 Press carefully.  Remember that the long side of the triangle is exposed bias.  Try to keep the iron over the short sides when you press toward the dark fabric.
 Match up your pairs of triangles and repeat the sewing and pressing process.  Continue to bring your subunits back to the original layout to make sure the pieces are facing the right way.
 Now that you have four triangles sewn together, you just need to add one more triangle to the end of each block.  

 Sew, press and check your layout again.  Light touches dark and dark touches light.
 Sew a center row to each triangle.  Mind your bias -- it can get out of hand.
 Here is your block in two halves.  I hardly ever pin, but I did pin these together to make sure the points all lined up just right.
There you go!  Consider pressing the center seam open, I tried it both ways to see which helped the points lie down the best.