Wednesday, April 30, 2014

Rainbow Scrap Sampler - Bento Box

This block is based on a 4 by 4 grid.  It uses 2 inch strips.
From the dark fabric cut one 2 inch square, one 2 by 3.5 inch rectangle and one 2 by 5 inch rectangle.
From the light fabric cut one 2 inch square, one 2 by 3.5 inch rectangle, one 2 by 5 inch rectangle and one 2 by 6.5 inch rectangle.
Start piecing from the bottom left corner, first sewing the two squares together and pressing toward the dar.
Next add the light colored 2 by 3.5 inch rectangle and press toward the left.  Add the dark green 2 by 3.5 inch rectangle to the top followed by the larger green rectangle.  Repeat one more round with the light green rectangles.
Your finished block will be 6.5 inches.  Tada!

Tuesday, April 29, 2014

Winding Down

School is officially starting to wind down.  We are reviewing for end of the year exams which will happen starting next Wednesday.  Though I did spend a bit of time this evening updating grades, mostly we have been baking.
 
 ANOTHER administrator at work is having a baby. No quilts this time, she already has all that she needs for nursery supplies, and so we are having a book shower.  The assignment was to find a snack and a book that tied together in some way to bring to the shower.  I chose If you Give a Mouse a Cookie because I just happen to have a mouse cookie cutter.  Sydney made sugar cookies for me.  She didn't want any help at all until it came to clean-up time.
 Anna was working of these caramel cookies from Chile for her Spanish celebration next week.  She wanted to try a practice batch first to perfect the recipe.
 Clean-up was an all hands on deck party because our dishwasher is broken!  We went this weekend and ordered a new one, but it has to be ordered and delivered.  We will all get a bit of practice with hand washing in the next few days.
 Monday was a big day for Anna.  This was the last photo of her with braces.
Here she is with her shiny straight teeth!  She celebrated by eating popcorn for lunch and dinner and snack.  She hasn't had any in the last two years and is making up for lost time.  
So no sewing tonight, but I have at least one or two blocks I would love to sneak in before the end of the month.  I am looking forward to putting away my purple and looking for greener pastures.  How about you?

Sunday, April 27, 2014

RSC Sampler Cracker

So, I thought the earlier Knot block was called cracker, but perhaps I was confused.  This one is most definitely Cracker.
Warning -- It has very odd measurements.  I think most blocks do that have a square in a square layout.  I tried to minimize the oddness, but it is an easy block despite the quirks.

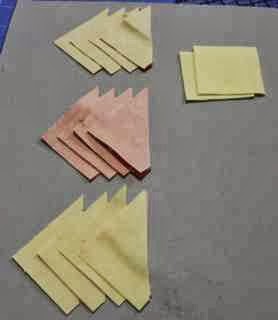
 You will need one square and one rectangle of light purple and one square and two rectangles of medium or dark purple.  I was using charm squares and didn't have two matching light squares.  Instead I chose two that I thought coordinated nicely.
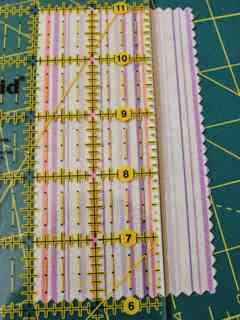
Each square is cut at 4 inches.  All the other directions I found all asked for 3 7/8, but for one block I would rather sliver trim at the end than cut odd sizes.  If I were making a whole quilt I would probably make a different decision.
Each rectangle however is cut 4.75 by 1 15/16.  Yes, I said one and fifteen sixteenths.
 Really it is just a smidge shy of 2 inches.  I was tempted to cut everything to two inches and use a generous seam allowance, but I measured the odd sizes instead.
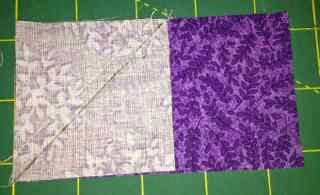
 First sew all three rectangles together with the light in the middle and the dark on either side.
Next cut each square in half diagonally and finger press to find the center.
Finger press your rectangle set as well and match the centers before sewing on each purple triangle to either end of the rectangles.
Press away from the center and trim the dog ears.
 Repeat the process of finger pressing and finding the center of the light blocks.
Sew the light blocks to opposite corners adjacent to the purple rectangles.
 Here is where my block is just a tiny bit big because I cut my squares to regular sizes.  I used s 6.5 inch square up ruler to make sure my block finished to a perfect size.  Honestly I was surprised at how little fabric was trimmed away.  I worry that my block would have been too small with smaller squares to start.
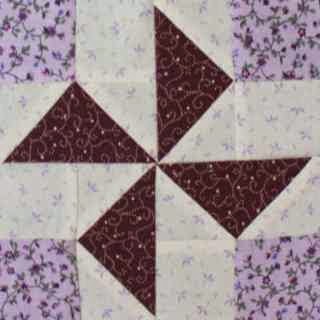
Here is the finished block.  It came together so quickly that I think it was worth weird measurements.  

RSC Sampler - Ceiling Fan

Here is another block based on the flying goose unit. This time I used the easy angle ruler because I had 2 inch strips all ready to go.  With scraps it is easier to modify the cutting to use what you have available.
Using two inch strips and the companion angle ruler, cut 4 triangles from the dark fabric.
Using the two inch strips and the easy angle ruler, cut 8 triangles from the light fabric.
Still using 2 inch strips, you will also need 4 light squares and four medium squares.
Sew light background triangles along one side of each dark goose.
Sew the light squares to the medium squares.
Finger press the light triangles open and sew the second light triangle to the other side of each goose.
Press toward the dark squares and away from the dark goose.
You should have four geese and four two patches.
Pair the two patches up with the geese, making sure all the unit have the dark square facing the same direction.  I like to sew with the geese on top so that I can try to sew through the intersection of the existing two seams to make sure my geese have sharp points.
Sew one two patch to the top of each goose unit.
The four blocks should be arranged in a rotating pattern as shown. Sew as you would for any four patch remembering to twirl the seams allowing the block to lie flat.  

RSC Sampler Antique Tile

Sometimes the simplest blocks can give you the most trouble. I was sure this classic block with just rectangles and squares would go together in a flash. Maybe next time.
The first time I made this block I did bad math and made a nine inch block instead of a 6 inch block.  Ooops.  Just ignore the gridlines on the mat.  
Cutting instructions:
Light fabric: 
1 square 2.5 inches.
4 squares 1.5 inches.
4 rectangles 1.5 by 2.5 inches
Medium fabric: 
4 rectangles 1.5 by 2.5 inches
Dark fabric
4 squares 1.5 inches
4 rectangles 1.5 by 2.5 inches.  

First sew the light and medium rectangles together on the long side
Next, sew the light and dark squares together into pairs.  Press toward the dark in both cases.
This is where I made my second mistake.  To get the seams to nestle nicely, you should sew the two patches of light and dark squares to the rectangles so that half of the dark squares point to the right and half point to the left.  You can rotate the finished pieces if you don't, but getting the seams to nestle becomes a trick.
Arrange the finishes pieces as a nine patch.  Notice that I didn't properly orient my corner units while sewing and had to rotate the seams to get it to work. The light rectangles should all be facing the same direction.  Sew as you would sew any nine patch, making sure you alternate the seams on the back.  

Saturday, April 26, 2014

Rainbow Scrap Sampler - Flying Geese

Another traditional block, flying geese are such a versatile addition to many quilt blocks. There are so many different ways to make them. Today I used the sew and flip method, but I think my favorite is still the easy angle ruler.  Feel free to use the method you enjoy most, the goose unit in this block is 4.5 by 2.5 unfinished.
For the flip and sew method I used you will need:
3 rectangles of dark purple 2.5 by 4.5 inches.  
6 squares of light purple 2.5 inches each
2 long skinny rectangles of light purple 1.5 by 6.5 inches
Start by drawing a line down the center of each light colored square.
Place a light square on one end of the dark purple rectangle and sew on the line.  To get bonus squares, sew again parallel to the first line.  Flip and press the square, trimming between the two sewn lines to harvest your bonus HST unit.  Repeat for each of the three goose units.
Sew another square to the opposite end of each rectangle, following the same procedure.
Line all three goose units up and sew them together in a nice straight line.  Press away from the tip of the goose.
Sew one long rectangle to each side of the center unit and press away from the geese.  

Rainbow Scrap Challenge Sampler - Knot Block

After a long and painful delay, I am finally back on task with the Rainbow Scrap Challenge Sampler.  April has been a busier month than anticipated, but with only 7 school days before the End Of Course for my little guys and 10 school days before the Advanced Placement Exam for my big kids, things will certainly start to calm down soon.
So with no further delay, here is the next block for the sampler!
Cutting directions are super simple.  A 16 patch grid for a 6 inch block needs 2 inch squares.  I used a dark, a medium and a light purple.
dark purple = 2 - 2 inch squares
medium purple = 6 - 2 inch squares
light purple = 4- 2 inch squares
light purple = 2 - 2 by 3.5 inch rectangles

When I first saw the block diagram on this one, the center four patch was the first thing that caught my eye.  I was thinking of doing that first and then building out around it.  Instead, it occurred to me that it would be easier to assemble as four patches instead.
So, here are the four patch units, two with dark corners and two with medium corners.  Notice that the light purple rectangle makes up half of each medium corner unit.  After laying out the pieces, pair up the squares and sew into twosies.
Pressing was a bit of a puzzle for me.  In hind sight, I should have done it differently.  I think that if you consistently press toward the medium purples you will be able to get everything lined up just right.  Pair the dark and medium twosies with the medium and light twosies.  Next pair the other medium and light twosies with the light rectangles.  Twirl your seams and press nicely.
Arrange the four patches so that the dark centers and medium centers all meet in the middle.  Hopefully your seams will all nestle nicely.  Sew the four four patches together and enjoy.  

ScrapHappy Weekend

Saturday has come again, and for the first time in recent memory, I have a weekend!  No school, no trips, no have to dos.  A weekend to sew and play and enjoy!  I can't wait.  Looking forward to checking in on all of your purple projects and even on sewing some of my own.  For now, I've found this collection of purple blocks in a bag that I set up at the begining of the month and then forgot about.  I'm off to have some sampler fun.

Use MisterLinky below to share your progress

Saturday, April 19, 2014

ScrapHappy Saturday - Visiting Violet

Though I have enjoyed seeing everyone else's purple projects, I must admit to being swept up in school right now with no time left to sew.  I know I keep saying this, but things really will slow down soon.  The last Lacrosse game of the season was Wednesday, Track is over, one by one, school things are winding down.  Today I will be at school all day hosting the AP Biology End of Year Review for students from all over the county.  Though it will be a busy day, it is lots of fun, and gets us all one step closer to the end of the year.
So for now, I will enjoy visiting all of you and hope for a bit of calm sometime soon.

Saturday, April 12, 2014

ScrapHappy Saturday - Purple Passions

So as you can see, not much sewing is going on for me today.  Academic Team has managed to make it to the semi-final round tomorrow and much buzzing in will be going  on.  We have spent the last two days hopping back and forth between matches and theme parks.  Yesterday was the Magic Kingdom and today was Animal Kingdom and Hollywood Studios.  Epcot may sneak in tomorrow based on how the matches fall.  Maybe I will find my machine again on Sunday?  I hope to be able to at least live vicariously through your purple projects until then.
Please use misterlinky below to share your purple projects, plans and proceedings.  Enjoy.


Sunday, April 6, 2014

The T-Shirt Quilt

A friend of mine has a son graduating from high school this year.  She wants to give him a T-shirt quilt as a graduation present.  I tried to convince her that she could do it with a little help, but she isn't crafty at all.  Instead she asked me if I could please make it for her.  What could I say?  I'm about 8 hours in so far -- stabilizing, cutting and laying out the shirts.  I cut them as rectangles this time and I am really liking the way it works.  Each shirt is cut at 14 by 18 which seems to work well for maximizing pattern placement.  Some of the shirts were a bit smaller, so I used the sleeves and pocket emblems to fill those out.  I'm waiting on fabric decisions next.  She wants masculine blues and greens.
Take a look at how big our neighborhood Sandhill Crane is getting.  He is almost as big as Mom now.  There is another family down closer to the main road with a tiny new chick.  It is so much fun watching them grow up each spring.  

Saturday, April 5, 2014

ScrapHappy Saturday - Parade of Purple


What a long strange week it has been!  Sorry for my recent absence from blogging and e-mail, and anything fun -- life has got me running to keep up.  This is always a busy time at school, but Lacrosse this year is pushing me past busy.  The recent business trip of my dear husband helped push me right to the point of wondering if I could get it all done.
It will, of course, all get done.  It always does.  April will be busy month, but after that things will be much calmer I hope.  So many apologies to the 153 people who sent e-mails.  I will try to start working my way down the list today.
There was absolutely no sewing for me this week.  Thankfully I had pre-scheduled of couple of blocks earlier this year.  You may have noticed the orange block on April 1 was one of those.  Ooops!  That was supposed to show up later, sorry for any confusion that it caused.  April is indeed the purple month.
To take care of a little business, I did the drawing for the March fabric giveaway of beautiful hand dyed fabric from Vick Welsh.  I had to draw twice because the first winner was a spam comment.  I really should go back and remove some of those.  So on try number two, the lucky winner was Sherrill who blogs at Quilting in my Sleep.  Congratulations Sherrill.  If you will send me your snail mail address, I will send off your fabric.


Friday, April 4, 2014

Rainbow Sampler - Depression Block

This one is called Depression Block. I would guess because it uses lots of little bits that might be leftover from other quilts? It is a nice one to use for those bonus bits form flip and sew corners.
Because it is a 4 by 4 block, the subunits are each 2 inches unfinished.  Using the easy angle ruler makes is easy to get your pieces the right size.  You will need 2 inch strips of light and dark fabrics.  I used a consistent light purple for the background and a variety of dark purples.
However you decide to do it, you will need 16 HST blocks.  Sew, remove dog ears and press toward the dark fabric.
Here is the layout of the block.  Basically the HST units are rotated so that they form bands of dark and light giving the block a diamond look.  It is really just 4 identical four patches when you break it down.
I sewed each four patch together and then pressed.  It might have been easier to match the seams if I had done it as one large block instead.
Here are the four patches sewn together to make a finished block.  

Tuesday, April 1, 2014

Rainbow Scrap Challenge Sampler - Mock LeMoyne Star

I pulled out the easy angle ruler again for this block.  I am sure getting my moneys worth out of this gadget.  I used it to cut three different combinations of HST blocks.
I used three fabrics for my block, a yellow background, a light orange and a dark orange.
Put right sides together of two strips of fabric and cut 4 triangles from each of the following combinations:
light orange and yellow
dark orange and yellow
dark orange and light orange
In addition to the triangles you will also need four 2 inch squares of the yellow background fabric.
Sew the HST units together, remove dog ears and press the seams toward the dark fabric.

Lay your squares out as shown in the picture above.
Notice that the center portion is a pinwheel.  The background portions meet in the center of the block and like colors connect.
Traditionally this block is mad with parallelograms of fabric, but that method requires inset seams.  This "cheater" method avoids inset seams by breaking the parallelograms into half square triangles.

Sew your blocks together being careful to nest the seams as the rows are sewn together.

I now realize that this went up in April instead of waiting for the orange or yellow month.  It was a scheduling error.  I'll make sure to link back to it later.  It happened once earlier and I had to delete and rewrite the entire post, so this one is staying put!  So sorry for all the confusion!!!